By popular demand, this is as demo of how I draw with Illustrator ;) To be honest I’m completely un-aware of how other illustrators use it and I’ve never had any lessons or read an instruction manual, this is just what what works for me. I always start with a scanned in sketch, I only draw directly on a blank page if it’s something really simple or geometric. I’ll not get into drawing and sketching here, might write another post about that some other time. I generally lock the layer the sketch is on then draw over it on another layer with the pen tool. Hopefully by watching the video you should get the idea, below is a bit more in-depth info.
The pen tool:
![]()
This is what Illustrator is all about for me, the pen tool is pretty much the only thing I use. I know a lot of people that don’t use Illustrator because they can’t get the hang of the pen tool, I suppose it isn’t that intuitive, but it’s pretty simple once you get the hang of it. Click and stretch – everytime you put an anchor point down you can move your cursor while the mouse button is held down to affect the curve. If for example you’re drawing a ‘s’ shape and you want the curve to flow gracefully one way to the next, just keep adding anchor points and Illustrator automatically flows the curve (no idea what the proper technical terms are for this stuff!) If you want to make a hard corner you hold down the Apple key (cursor turns to little white arrow) and click the canvas (not on the line). Now if you click on the last anchor point you can carry on as before and send the line off at a sharp angle.
Tweaking the handles:

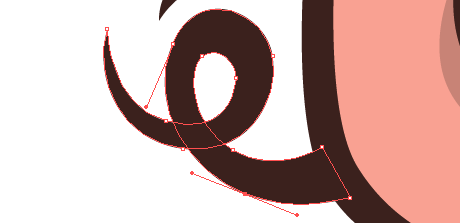
![]() This is the key really, you try and draw it right with the pen tool, but you’ve always got to select the odd anchor with your little white arrow at some point and tweak them. Just click it, move it around, pull it’s handles in & out until your curves are looking just right. You can hold down the Apple key to get this tool while using the pen.
This is the key really, you try and draw it right with the pen tool, but you’ve always got to select the odd anchor with your little white arrow at some point and tweak them. Just click it, move it around, pull it’s handles in & out until your curves are looking just right. You can hold down the Apple key to get this tool while using the pen.
Colour palette:

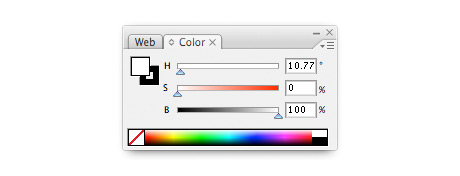
It’s down to personal preference I suppose, but I like to use the HSB colour palette over RGB or CMYK for making the colours I use. Mainly because I prefer my colours unsaturated – you can find the Hue you want with the top slider (H), then I generally take the saturation down a bit (S) slider and add a bit of black (B).
Pathfinder palette:

This is a really handy palette that I’m always using. Not sure what half the stuff does, but (1) joins shapes together – remember to click expand afterwards (from the menu bar: Object > Expand) And (2) divides over lapping shapes – remember to ungroup afterwards (from the menu bar: Object > Ungroup) Trust me, they are more useful than they sound!
Any questions just ask! I’ll try and update this post with feedback. Confused about of pork nose? Just playing around with the Poke’s logo, which my missis designed incidently.

Great tutorial! It’s basic but cool pen-tool tut.
It’s basically just two circles on top of each other, the smaller circle is aligned to the top left. If you select both shapes you can click the ‘divide button’ in the pathfinder menu in Illustrator (it’s the button with the 3 shapes seperated). Hope that helps!
I cannot for the life of me figure out how you’re getting the pupil of the eye to conform to that almost lunar shape. Could you tell me what you’re joining/dividing/etc. to get that? I’d really appreciate it. :0)
If you want, you could use the live paint feature. Once you have your black outlines done, just select everything and go to object:livepaint:make. Then you can quickly throw the colors in without having to do all the pen work. After you are done, hit the expand button.
Nice work Cookie!
I’m not sure whether you would like to increase traffic to this site or not, but if so, I think bittbox.com would be really interested in posting this… which would certainly generate some visitors. Might be worth submitting it to them?.. just a thought.
As for other tutorials – I for one would be interested to know how you created that animated favicon!
Cookie,
How’s it going?
Just seen your tutorial clip, really interesting to see,
Good work!
Bob
I thought I had left a comment a couple of days ago saying how good this tutorial is. Anyway, re sending it now! :)
keep up the great inspiring work cookie! ;)
I make love 6 times faster than real life.
Ah good tip Jak. I sped it up in quicktime, think it’s 6 times faster than real life.
Very nice.
Saw you reversing your outline/fill colors a couple times. Shift X will do that for you. Very handy.
Curious, Looks sped up a bit; whats the realtime length?
As a rubbish, party-invite-during-lunch-hour designer this is really helpful. Thanks!
Yeah good tip Gradiate, I like doing the long way round just so I can thicken or thin the line where I feel it needs it.
Nice tutorial. To save time for slower people instead of drawing the 2nd line (for example round the outline of the charecter) use the offset path function. You can choose how many pts you want it set away. Its a great item.
Thanks Cookie.
Sorry about the double post.
Your tut’ was so good I did it twice:)
Love your stuff!
Cheers Scotty, sweet beetle by the way!
http://www.iamscotty.com/blog/?p=18
What a great tutorial:)
Tut’s usually bore me to the point where I quit before they finish but I watched this twice. I think it’s because the image is so nice.
Thanks for the insight.
S:)
What a great tutorial:)
Tut’s usually bore me to the point where I quit before they finish but I watched this twice. I think it’s the because the image is so nice.
Thanks for the insight.
S:)
When i click on one anchor point, it selects them all.
thanks for sharing cookie. Very cool!
Sounds like the whole path is selected Tim. Try clicking and dragging the little white arrow over the anchor point to select only that one?
Hi Si, nice tut’. You mention in the explanation that you can shift to the White-arrow tool as your drawing by holding the apple key to allow you to move a node as your drawing. Im using a PC and when i hold down the CTRL key it changes to the White-arrow tool, but will only allow me to move ALL the nodes, not just one. Any ideas how i can just move one? Do any of your Poke mates use a PC for this purpose? Thanks mate.
Cheers Nico :) Well it was you who got me into the snapz pro recording thing in the first place! Remember doing this: http://www.pokelondon.com/portfolio/everyman/cock-a-doodle/
In retrospect, probably should of speeded it up a bit.
JEY! Really like your new tutorial entries! Really nice seeing someone spending some time on creating content.
Good work.